
H22 Civic EG Hatch: Project LOW LOW Boost

Thread Starter
Registered User
Joined: Jun 2003
Posts: 1,936
Likes: 0
This is one of our on going project cars. If you have been to our shop or stay up to date on our shop forum, you know we do things a little differently around here.
Unlike most shops that purchase manifolds and simply bolt them on. We make ours from scratch.
here is our maniold

Here is a basic breakdown of things to do:
Wire tuck
Weld/shave engine bay
Box frame
repaint bay
custom Proven Power turbo manifold
custom Proven Power exhaust
custom Proven Power charge pipe
and more to come...
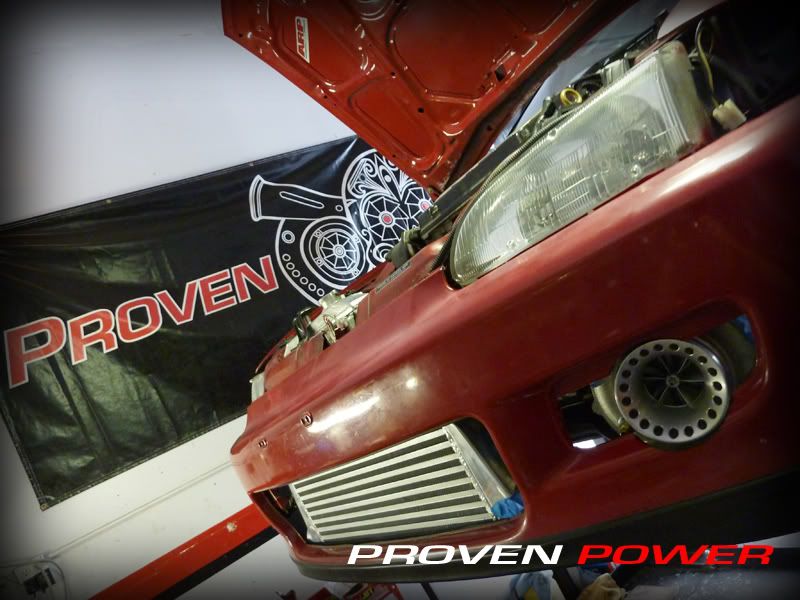
So we started with cutting/grinding front core support to make room for the new Precision turbo. Then we centered the intercooler nad mounted it up...


Next we uninstalled the sweet NA header that came on the car...


Once we got a better look at what we had to work with we raised the turbo up into position.


After measuring & measuring and taking even more measurements we went ahead and tacked the collector for mock up.

Then we went ahead and got our num 1 runner all welded in so that we could remove the steel rod we welded to the frame.

Then we went on to the next runner


and now to runner num 3


Once number 3 was all welded we remounted the turbo and rechecked fitment to make sure everything was EXACTLY where we planned it to be !

Then we started cutting the bumper for a flush fitment

Everyone likes weld pics
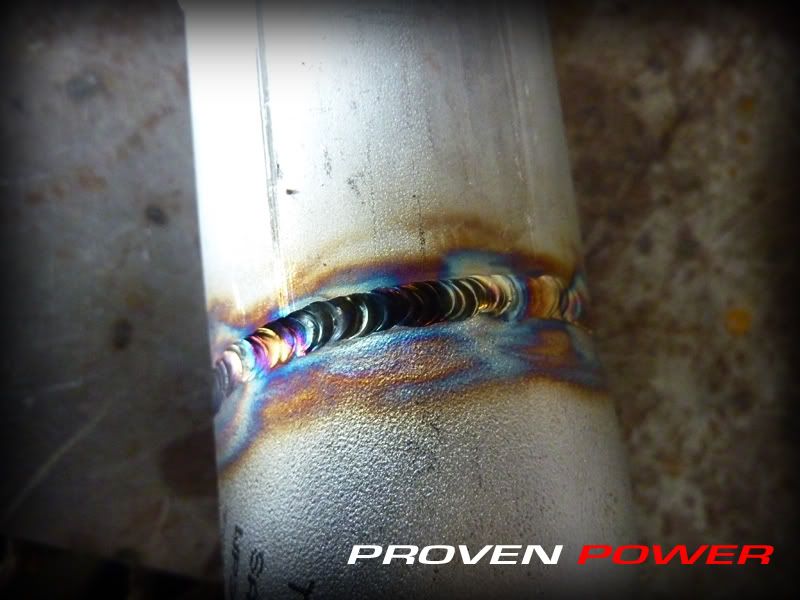
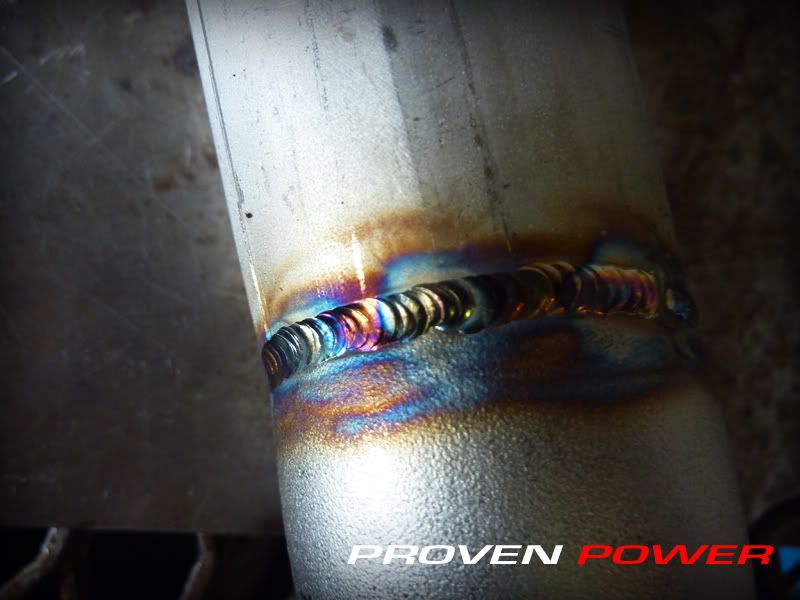
We couldnt handle it so we took the tape off for a sneek peek
Come back for more tomorrow !
Unlike most shops that purchase manifolds and simply bolt them on. We make ours from scratch.
here is our maniold
Here is a basic breakdown of things to do:
Wire tuck
Weld/shave engine bay
Box frame
repaint bay
custom Proven Power turbo manifold
custom Proven Power exhaust
custom Proven Power charge pipe
and more to come...
So we started with cutting/grinding front core support to make room for the new Precision turbo. Then we centered the intercooler nad mounted it up...
Next we uninstalled the sweet NA header that came on the car...
Once we got a better look at what we had to work with we raised the turbo up into position.
After measuring & measuring and taking even more measurements we went ahead and tacked the collector for mock up.
Then we went ahead and got our num 1 runner all welded in so that we could remove the steel rod we welded to the frame.
Then we went on to the next runner
and now to runner num 3
Once number 3 was all welded we remounted the turbo and rechecked fitment to make sure everything was EXACTLY where we planned it to be !
Then we started cutting the bumper for a flush fitment
Everyone likes weld pics
We couldnt handle it so we took the tape off for a sneek peek
Come back for more tomorrow !
__________________

DYNO TUNING/CUSTOM FAB/METAL POLISHING & PORTING/ENGINE SWAPS
CHIPPING & SOCKETING/ELECTRICAL TROUBLESHOOTING/WIRING
CHIPPING & SOCKETING/ELECTRICAL TROUBLESHOOTING/WIRING
Last edited by NeKe1point0; Apr 30, 2010 at 08:12 PM.
ppssshsshhhhhhh
Joined: Dec 2001
Posts: 2,595
Likes: 0
nice! i need to stop by and check it out!
__________________
www.mcgtile.com - Professional Marble and Tile Installation
Racing Integration
Proven Power
www.mcgtile.com - Professional Marble and Tile Installation
Racing Integration
Proven Power
Thread Starter
Registered User
Joined: Jun 2003
Posts: 1,936
Likes: 0
Stop by sun ! Dyno day !
__________________
DYNO TUNING/CUSTOM FAB/METAL POLISHING & PORTING/ENGINE SWAPS
CHIPPING & SOCKETING/ELECTRICAL TROUBLESHOOTING/WIRING
CHIPPING & SOCKETING/ELECTRICAL TROUBLESHOOTING/WIRING
Thread Starter
Registered User
Joined: Jun 2003
Posts: 1,936
Likes: 0
Thanks, were tryin to keep up with you big dogs
__________________
DYNO TUNING/CUSTOM FAB/METAL POLISHING & PORTING/ENGINE SWAPS
CHIPPING & SOCKETING/ELECTRICAL TROUBLESHOOTING/WIRING
CHIPPING & SOCKETING/ELECTRICAL TROUBLESHOOTING/WIRING


Thread Starter
Registered User
Joined: Jun 2003
Posts: 1,936
Likes: 0
Total sleeper 
Ok maybe not...
Ok maybe not...
__________________
DYNO TUNING/CUSTOM FAB/METAL POLISHING & PORTING/ENGINE SWAPS
CHIPPING & SOCKETING/ELECTRICAL TROUBLESHOOTING/WIRING
CHIPPING & SOCKETING/ELECTRICAL TROUBLESHOOTING/WIRING
Thread Starter
Registered User
Joined: Jun 2003
Posts: 1,936
Likes: 0
This is car is not daily driven.
We made sure to leave enough clearance for a filter to be installed if driven on the street.
We made sure to leave enough clearance for a filter to be installed if driven on the street.
__________________
DYNO TUNING/CUSTOM FAB/METAL POLISHING & PORTING/ENGINE SWAPS
CHIPPING & SOCKETING/ELECTRICAL TROUBLESHOOTING/WIRING
CHIPPING & SOCKETING/ELECTRICAL TROUBLESHOOTING/WIRING
ppssshsshhhhhhh
Joined: Dec 2001
Posts: 2,595
Likes: 0
damn thats right, i didnt even realize it was so soon. ill more than likely be there and ill also put my h22 on the rollers to see where its at

__________________
www.mcgtile.com - Professional Marble and Tile Installation
Racing Integration
Proven Power
www.mcgtile.com - Professional Marble and Tile Installation
Racing Integration
Proven Power
Thread Starter
Registered User
Joined: Jun 2003
Posts: 1,936
Likes: 0
Nice ! H22 Powa !
__________________
DYNO TUNING/CUSTOM FAB/METAL POLISHING & PORTING/ENGINE SWAPS
CHIPPING & SOCKETING/ELECTRICAL TROUBLESHOOTING/WIRING
CHIPPING & SOCKETING/ELECTRICAL TROUBLESHOOTING/WIRING


