Johnny Cash Mustang project

Registered User
Thread Starter
Join Date: Oct 2007
Posts: 6,052
Likes: 0
Received 0 Likes
on
0 Posts
OK, so after measuring things up I was still not happy with the height of the car, I was trying to get the clearance down to 4 inches. After looking things over again I decided there was only one way to do this and keep enough suspension travel.......notch the frame
and away we went................

This is the piece that was removed from the rail, in the background you can see where the notch was filled and welded back together....

and with it all back together..........again

in this photo you can clearly see the wheelbase stretch by looking at the front fender well.

and away we went................
This is the piece that was removed from the rail, in the background you can see where the notch was filled and welded back together....
and with it all back together..........again
in this photo you can clearly see the wheelbase stretch by looking at the front fender well.

Registered User
Thread Starter
Join Date: Oct 2007
Posts: 6,052
Likes: 0
Received 0 Likes
on
0 Posts
OK we had a oil pressure debacle that I had to deal with, which included pulling the engine back out of the car and going through it...again.
So it finally runs and motivates on it's own.....
I have a bunch of detail work to do in the engine bay

and the interior


So it finally runs and motivates on it's own.....
I have a bunch of detail work to do in the engine bay
and the interior
Last edited by blacksheep-1; 12-15-2012 at 03:30 PM.


Registered User
Join Date: Apr 2009
Posts: 160
Likes: 0
Received 0 Likes
on
0 Posts
I love how this project is coming along..never seen a mustang with those flares but it definitely works...if you ever want to do bodywork on another fox let me know 
__________________
'88 Mustang GT, Edelbrock Intake Mani..70mm tb w/ egr delete...mass air conversion with 24# injectors...4:11 gears...5 lug disc swap...e303 cam...bbk shorties x-pipe to flowmaster dumps...bbk cai....lowered WWW.FACEBOOK.COM/SNAKESNSTANGS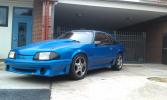
'88 Mustang GT, Edelbrock Intake Mani..70mm tb w/ egr delete...mass air conversion with 24# injectors...4:11 gears...5 lug disc swap...e303 cam...bbk shorties x-pipe to flowmaster dumps...bbk cai....lowered WWW.FACEBOOK.COM/SNAKESNSTANGS
Registered User
Thread Starter
Join Date: Oct 2007
Posts: 6,052
Likes: 0
Received 0 Likes
on
0 Posts
...if you ever want to do bodywork on another fox let me know
ANYWAY....roll out time


It actually looks remarkably stock until you take a second look.
It's hard to believe it started out as this 50 buck hulk

Last edited by blacksheep-1; 01-21-2013 at 07:39 PM.
Registered User
Thread Starter
Join Date: Oct 2007
Posts: 6,052
Likes: 0
Received 0 Likes
on
0 Posts
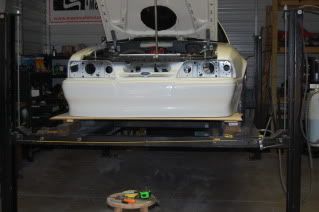
OK so I decided that this car needs a splitter, not so much to aid the high speed handling but rather to protect the front body work from errant cones, which sooner or later will be assassinated So I purchased some 3/8 plywood and mocked up the splitter
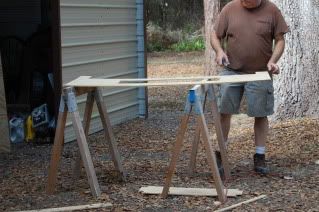
I then measured 3.5 inches from the spoiler lip dot by dot to establish the curve of the splitter..

Then I connected the dots

and started laying it out to cut
I then measured 3.5 inches from the spoiler lip dot by dot to establish the curve of the splitter..
Then I connected the dots
and started laying it out to cut
Registered User
Thread Starter
Join Date: Oct 2007
Posts: 6,052
Likes: 0
Received 0 Likes
on
0 Posts
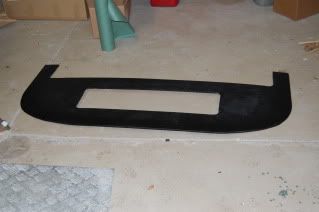
OK so the splitter was cut out and painted with bed liner black since that is the most bulletproof stuff I could think of...In retrospect I should have cut out several small access holes instead of one big one...next time
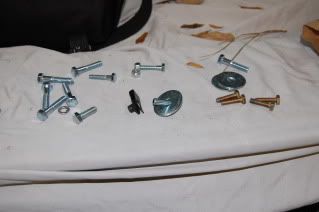
I picked up some hardware, especially the "C" type captive nuts for inside the fiberglass spoiler.
I bolted it on the car using existing holes in the radiator support and then drilling the spoiler lip

I also installed the aluminum hood pins and used rubber tubing to create the right hood height to line up with the fenders

the hood pins and splitter installed
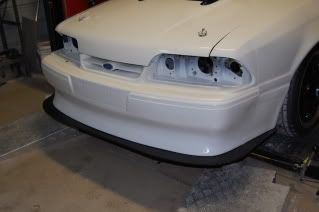
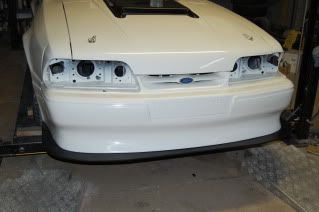
There, a functional splitter that any Honda owner could love
I picked up some hardware, especially the "C" type captive nuts for inside the fiberglass spoiler.
I bolted it on the car using existing holes in the radiator support and then drilling the spoiler lip
I also installed the aluminum hood pins and used rubber tubing to create the right hood height to line up with the fenders
the hood pins and splitter installed
There, a functional splitter that any Honda owner could love
Registered User
Thread Starter
Join Date: Oct 2007
Posts: 6,052
Likes: 0
Received 0 Likes
on
0 Posts
Alrighty! several updates, first off I got tired of the stock headers leaking, I had used GT40P heads and had to "massage" the headers to fit the whackadoo plug angle. So I gave up and bought a set of Ford Motorsport GT40P headers and installed them, along with an "x" pipe and turbo mufflers. The I've slowly been installing things like new belt line moldings, and weatherstripping so the car started to look pretty nice, so nice in fact that the crappiest part of the exterior was the paint job soooooo. I pulled everything back off the car and block sanded the fenders and other indiscretions that I had ignored because it was a "race car" paint job. That has now been done and the car is in re-reassembly with all the new moldings and such.
Pics to follow.
Pics to follow.
Registered User
Thread Starter
Join Date: Oct 2007
Posts: 6,052
Likes: 0
Received 0 Likes
on
0 Posts
Ok painted, buffed and most of the details added.....
Interior, which still needs to be cleaned and detailed..

Fuel cell and rollover vent..

dash and tach.....

with all the body work attached...


Interior, which still needs to be cleaned and detailed..
Fuel cell and rollover vent..
dash and tach.....
with all the body work attached...


