***Photo Tech: Techniques and Important Information***

Heavy Artillery Co.
Join Date: Jul 2004
Posts: 6,811
Likes: 0
Received 0 Likes
on
0 Posts


Informations and Pictures Courtesy Of: CanTheWhales.
Alright, Step 1 (instructions under image)
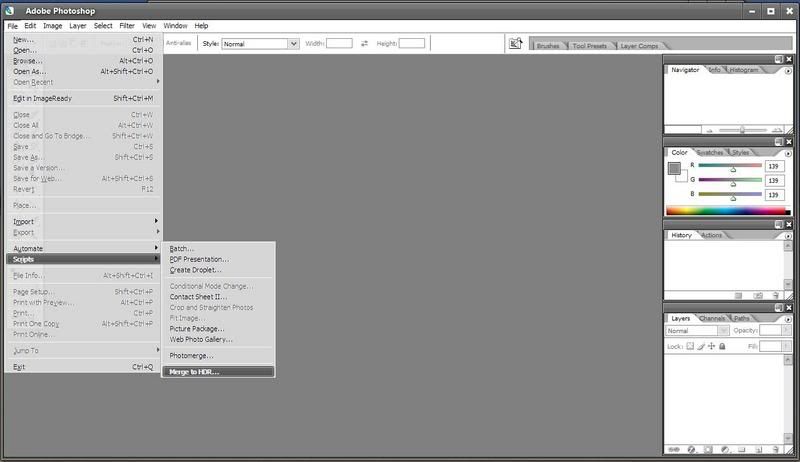
Select "Merge to HDR"
Step 2
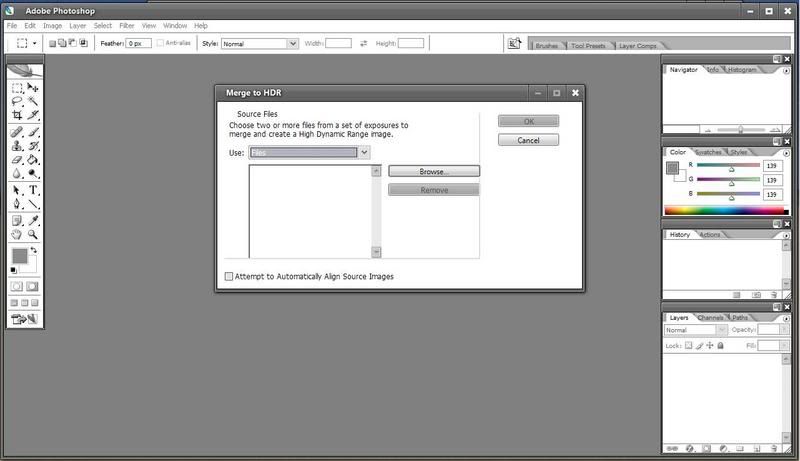
Here's the window that will come up
Step 3
After you select your three or more images click okay and wait. (This takes a minute of so and the screen will flash with windows opening and closing)
Step 4
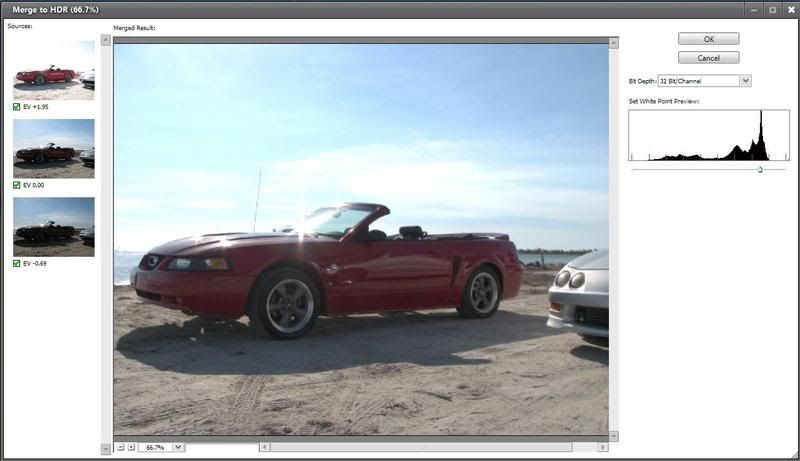
This window will come up when the process is finished. Notice the three images on the left, these are the ones that I took (one regular, one over, and one under). Here you set the Whitepoint like Daredevil had said on the histogram. Also for better compatability and further adjustments, set the Bit/Chanel down to 8
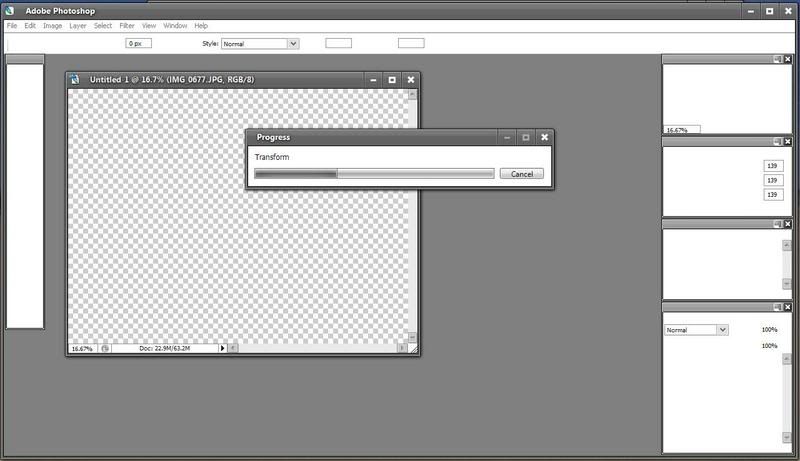
Step 5
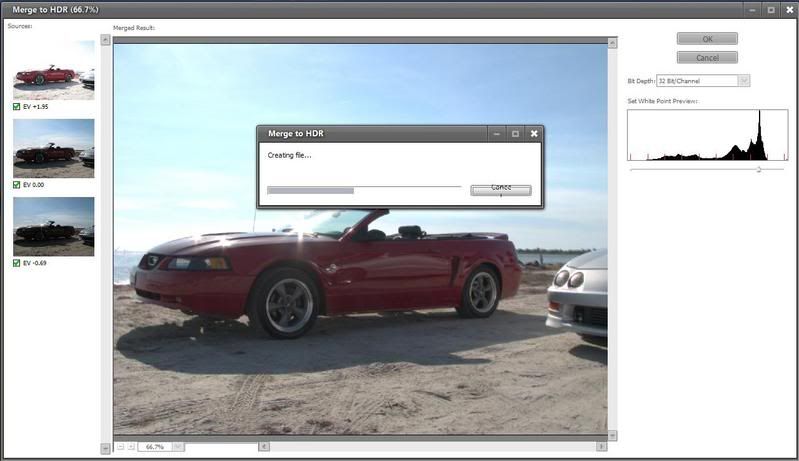
Click okay and wait for the progress bar.
Step 6
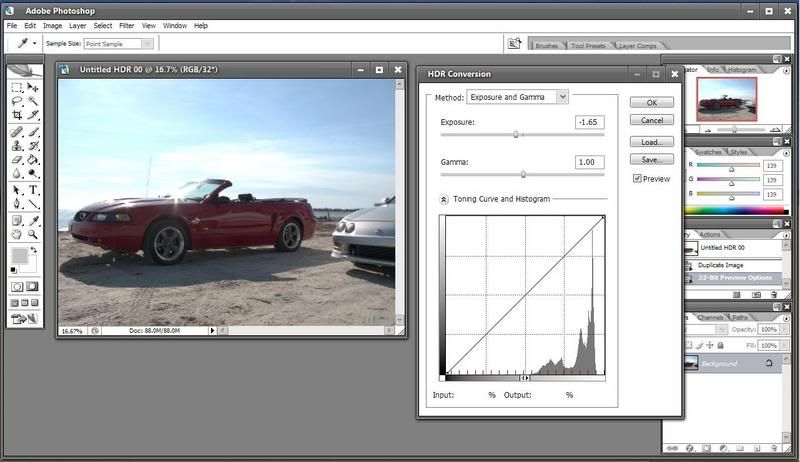
This is the tonal mapping I was mentioned earlier. Here you can change the exposure if neccesary.
Step 7
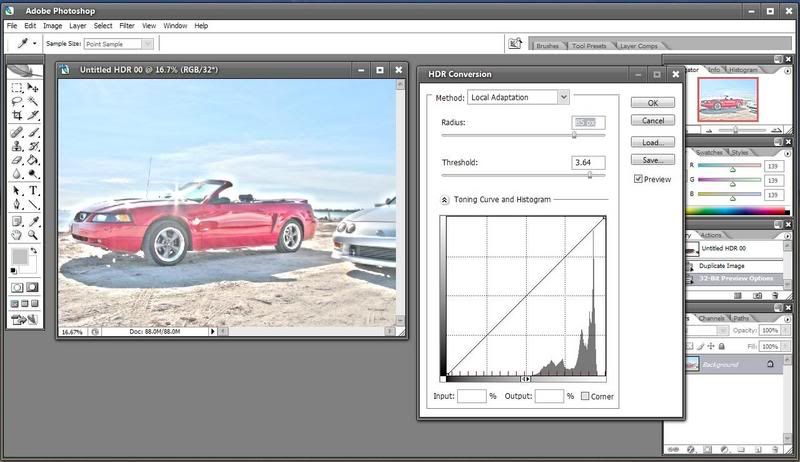
On the drop down go to "local adjustment". Here you can change the radius and threshold and play with them how you like. I find setting them a little higher creates a surreal "glow" kind of effect. Your choice.
Step 8
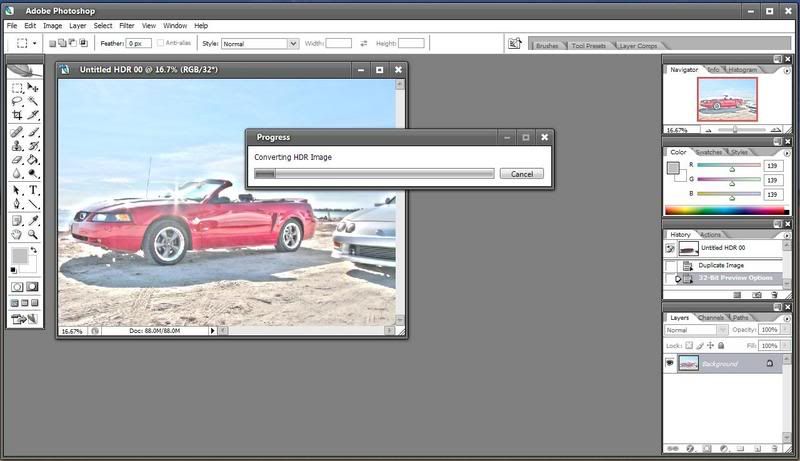
Click okay and wait, the image is now being made.
Step 9

At this point you're basically done, but as you can see mine were done on the beach and they were still really washed and I also want to show one more thing....
Step 10
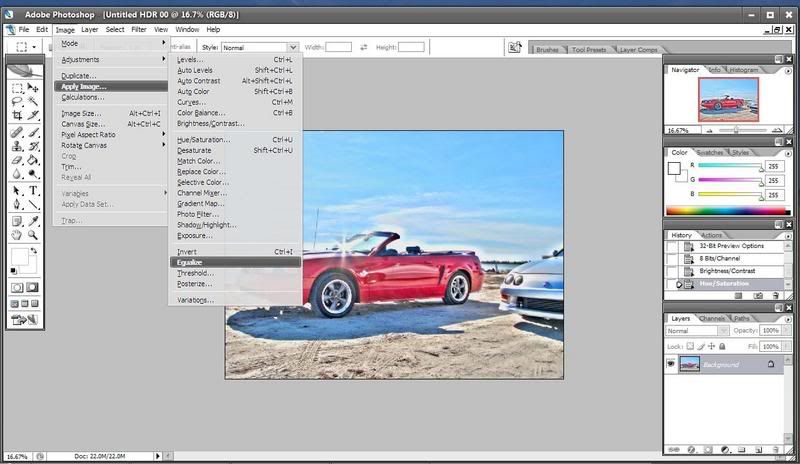
Under adjustments, select "equalize" This will level some of the high spots and make the image a little more "deeper" looking.
Step 11
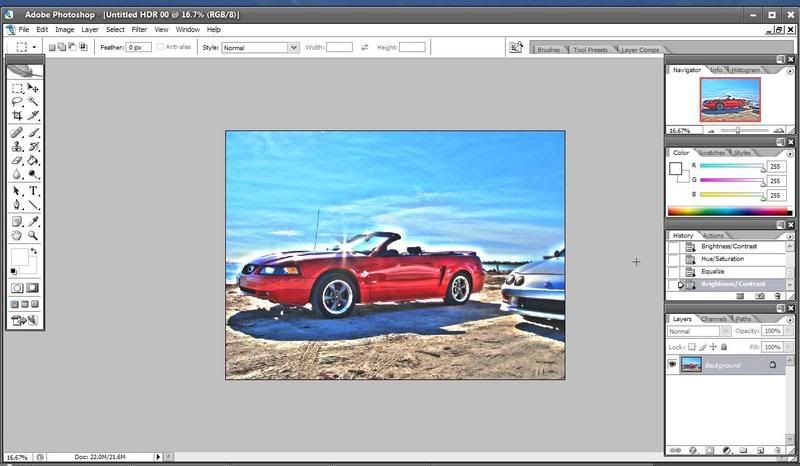
Notice the sky is much blue-er? That's equalization. If your still not satisfied, you can go into image> adjustments>... and and change hue, color balance, contrast, whatever, but this is the best this picture will really ever be.
So there, I hope this helps, and I'm sorry they weren't a nice of pictures as Kirk's but they were all I had at the moment.
Also thanks to ShiZor9 for letting me shoot his 'Vert that day.
Again I hope this helps, if not let me know and I'll see if I can better explain it or fix any problems.
Alright, Step 1 (instructions under image)
Select "Merge to HDR"
Step 2
Here's the window that will come up
Step 3
After you select your three or more images click okay and wait. (This takes a minute of so and the screen will flash with windows opening and closing)
Step 4
This window will come up when the process is finished. Notice the three images on the left, these are the ones that I took (one regular, one over, and one under). Here you set the Whitepoint like Daredevil had said on the histogram. Also for better compatability and further adjustments, set the Bit/Chanel down to 8
Step 5
Click okay and wait for the progress bar.
Step 6
This is the tonal mapping I was mentioned earlier. Here you can change the exposure if neccesary.
Step 7
On the drop down go to "local adjustment". Here you can change the radius and threshold and play with them how you like. I find setting them a little higher creates a surreal "glow" kind of effect. Your choice.
Step 8
Click okay and wait, the image is now being made.
Step 9
At this point you're basically done, but as you can see mine were done on the beach and they were still really washed and I also want to show one more thing....
Step 10
Under adjustments, select "equalize" This will level some of the high spots and make the image a little more "deeper" looking.
Step 11
Notice the sky is much blue-er? That's equalization. If your still not satisfied, you can go into image> adjustments>... and and change hue, color balance, contrast, whatever, but this is the best this picture will really ever be.
So there, I hope this helps, and I'm sorry they weren't a nice of pictures as Kirk's but they were all I had at the moment.
Also thanks to ShiZor9 for letting me shoot his 'Vert that day.
Again I hope this helps, if not let me know and I'll see if I can better explain it or fix any problems.
__________________

Last edited by DD.; 09-22-2007 at 07:31 AM.
I'm a Photographer!
Join Date: Feb 2004
Posts: 5,759
Likes: 0
Received 0 Likes
on
0 Posts
can i do this in CS? im about to look and see if i can right now...
i just looked and i def. dont have those options. or near as long a drop down when i go under scripts. all i get is. actually wait. i just went under automate and there was something called photomerge.
will that do the same thing?
i just looked and i def. dont have those options. or near as long a drop down when i go under scripts. all i get is. actually wait. i just went under automate and there was something called photomerge.
will that do the same thing?
__________________
Nikon D300 | 10-20 | 18-50 2.8 | 70-300 VR | 50 1.8 | 80-200 2.8
Nikon D300 | 10-20 | 18-50 2.8 | 70-300 VR | 50 1.8 | 80-200 2.8
Last edited by Michael.; 09-22-2007 at 12:20 PM.
...Your Mom
Join Date: Apr 2005
Posts: 2,304
Likes: 0
Received 0 Likes
on
0 Posts
can i do this in CS? im about to look and see if i can right now...
i just looked and i def. dont have those options. or near as long a drop down when i go under scripts. all i get is. actually wait. i just went under automate and there was something called photomerge.
will that do the same thing?
i just looked and i def. dont have those options. or near as long a drop down when i go under scripts. all i get is. actually wait. i just went under automate and there was something called photomerge.
will that do the same thing?
Photomerge is not the same per say... CS2 (or later is required) and lightroom won't do it either. Your best bet is to download CS2 from somewhere, it's just basically an upgraded version.
And Daredevil, I'm glad I could help. Didn't ever think anything I wrote would warrant sticky status, but that's really cool, Thanks.
__________________

I'm a Photographer!
Join Date: Feb 2004
Posts: 5,759
Likes: 0
Received 0 Likes
on
0 Posts
im always sketched out about downloading such programs for free...
I use frostwire for everything, but im hesitant about programs such as this...
know anywhere safe?
I use frostwire for everything, but im hesitant about programs such as this...
know anywhere safe?
Big Black Trucking
Join Date: Aug 2006
Posts: 968
Likes: 0
Received 0 Likes
on
0 Posts
I got bored and couldn't sleep so i started to do some reading and found some good stuff. Every thing im posting is from Photography: Share, Learn, Create in the Photography.com Community its a good place if you want to learn.
Basic Photography Concepts
Most of us aren’t professional photographers, but many of us take our amateur photography seriously. Over time, we come to realize that there’s a lot more to taking pictures than just pointing and shooting! In fact, a photographer who’s serious about his hobby should learn about topics such as lighting, exposure, composition and camera angles, to name a few.
Lighting and Exposure
Have you ever taken pictures that are so light or so dark that you can hardly make out the subjects? If so, you’re aware of how important the proper lighting and exposure can be in photography.
How the lighting of a scene affects the exposure of the film is one of the most basic photography concepts. The more light within the scene, the more the film will be exposed. Conversely, the less light a scene has, the less the film will be exposed. While overexposed film turns out pictures that are too bright, underexposed film will be too dark, appearing “blacked-out.” Understanding how to manipulate lighting will help a photographer properly expose his film.
In any given scene a subject can be fully lit with direct light, fully lit with indirect light or partially lit with back lighting or ambient lighting. Any directly lit subject is relatively easy to photograph, meaning that the film will be properly exposed and the picture will “turn out.” On the other hand, partially lit subjects are a bit more elusive: generally, the lighting or film speed should be manipulated to ensure the adequate level of exposure.
Learning how to alter the film speeds and lighting in poorly lit scenes takes some effort. However, a photographer can purchase a light meter, a tool that measures the amount of light in a scene. Given this measurement, the photographer can choose the appropriate film speed.
Composition and Camera Angles
Another basic principle of photography is composition, or the technique of setting up the subject within the camera’s frame. The proper composition of a shot is directly related to the angle at which the photographer takes the picture. With a particular camera angle and a planned composition, a photo can draw in the viewer’s eye, add meaning to the image or add a sense of movement and dynamism to the scene.
If the photographer wants his viewer to focus on a certain aspect of the shot, he can place the subject in a certain area of the frame. For example, putting the subject higher in the frame gives the subject an imposing presence on the viewer. On the other hand, placing the image lower tends to make the subject more submissive and possibly more mysterious to the critical viewer’s eye.
By drawing the viewer’s eye to a particular part of a picture, the photographer also invests a particular meaning of feeling to his shot. Depending on the subject photographed, its placement within the frame can make it appear more mysterious, forceful, compliant, or intriguing.
Another set of basic photography concepts involves the skills used by a photographer to make an image appear dynamic. For instance, a shot with the subject framed directly in the middle can make the viewer feel as though he is falling into the subject.
An example of this would be a picture of a person looking through a hollow log while the photographer is at the other end of the log snapping a picture of the person’s face. In this shot, the viewer’s vision moves through this tunnel, shooting immediately towards the person’s face. While not as overtly dynamic as action shots, this sort of compositional concept adds a subtle sense of movement to the picture.
More Advanced Photography Concepts
If you want to further expand your knowledge of photography concepts, start experimenting with some more advanced techniques, such as:
* aperture settings
* depth of field measurements
* focal lengths
* shutter speed settings.
__________________
Trucking them states
Trucking them states
Last edited by budakinns; 10-04-2007 at 10:29 PM.
Big Black Trucking
Join Date: Aug 2006
Posts: 968
Likes: 0
Received 0 Likes
on
0 Posts
Basic Composition for Photography
Photography composition skills mark the difference between a photograph and a snapshot. Point and click shots are taken without considering basic composition. In these cases, you usually wind up with a confusing picture with either a blurry or a distracting photo. Basic photography composition is easy to learn and apply to your photographs. The resulting improvement will delight you.
What the Camera Sees
Basic Composition Although basic photography composition can be figured out in minutes, mastering it takes a bit longer. One of the most important tips is to look carefully through the viewfinder each time you take a photo.
While your eyes may be focused on your intended subject, the camera doesn’t act like a human eye. It will record everything in the viewfinder.
Basic photography composition requires you to see as the camera, taking in foreground, background and everything surrounding your intended subject. You can alter what is included within the viewfinder’s frame by changing the angle at which you shoot your pictures.
Points of Interest and Basic Photography Composition
Before you take a photo, examine the environment. A large part of basic photography composition is an awareness of your subject’s surroundings. A well-composed photo has only one point of interest, meaning that the eye is drawn to one area of the photo. Whether the point of interest is a group of people or a train, it shouldn’t have to compete for the viewer’s attention.
Examine the foreground and background before you shoot: if you’re taking a picture of Grandpa, will that rose bush in the foreground draw the eye away from your subject? If so, move until Grandpa isn’t competing with the bush to be the center of attention.
Also, make sure that your subject can be seen. If your subject is too far away from the camera or dwarfed by a building or large object, you will not effectively capture the subject in your photo.
Basic Composition in Thirds
A simple guideline for bringing your point of interest to the foreground of a photo is to mentally divide the camera viewfinder into a three by three grid. You can then use the intersection points of the grid to experiment with different angles for the photograph.
The imaginary grid is used differently depending on whether you’re shooting a portrait or a landscape:
* portrait : Use the vertical lines to position a portrait. Choosing to center your subject in the middle third or one of the side thirds can radically alter the feel of your photo.
* landscape : Center a landscape photo on the horizontal gridlines. Using the upper thirds will give you a picture that focuses on the foreground, while centering the landscape in the bottom grids will give you a photo with a focus on the horizon and sky.
Group Photos
When taking a photo of a group of people, try the shot from different viewpoints to get the most interesting shot. Many photographers have a “rule of three” when it comes to group photos: avoid straight lines in any group containing more than three people.
One rule for composing a picture that features a large group of people is to avoid “high school band” photos: people at the back of such photos often have their faces obstructed by the people in front of them. Experiment with different angles. Try taking the shot from both high and low angles to see which is more effective for your purposes.
Action Shots
Basic composition of action or sports photos can be tricky because of the movement in these shots. Because you can’t “pose” these photos, the often appear blurry or out of focus if done incorrectly.
The best action shots are taken as close to the action as possible. Of course, this rule does have its limitations. Security officials and safety risks are some of the main roadblocks to capturing action shots. The key is to get as close as possible without intruding on the action or risking your own safety.
Action shots are easiest to take when the action can be predicted ahead of time. For example, a hockey player on a breakaway will try to shoot the puck; the horses at a horse race will explode out of the gate at the beginning of the race. Anticipating such action helps you set up and capture the photograph you want.
Angles and Basic Composition
The angle at which you take the shot is the key to crafting a photo’s composition. Basic photography composition usually holds that a subject shot diagonally makes a more dynamic photo. Look for imaginary diagonal lines when trying to take a more dramatic, intense photo.
For a full body shot or portrait shot, don’t be afraid to turn the camera sideways. If you take portraits with a straight on angle, these shots will have a lot of wasted space on either side of your subject.
Playing with the angle of a shot can make all the difference in basic photography composition. As you get more familiar with photography composition, experiment with low and high angle shots, as well as shots taken from below or above your subject.
Breaking the Rules
Finally, remember that the rules of basic photography composition aren’t set in stone. Instead, use them as guidelines for your own creative ideas. Follow the guidelines of basic composition until you’re comfortable with them and then start experimenting. Sometimes ignoring the guidelines produces a unique, striking photograph. Yet, be sure to understand the basics before you play with the rules of basic photography composition.
__________________
Trucking them states
Trucking them states
Big Black Trucking
Join Date: Aug 2006
Posts: 968
Likes: 0
Received 0 Likes
on
0 Posts
Shutter Speed
Shutter Speed, measured in seconds, refers to the length of time that the camera�s shutter remains open to let light in through the lens to record a given image onto the film.
The standard shutter speed that a photographer generally uses on a sunny day is 1/125th of a second. A photographer will adjust the shutter speed according to a few of the following factors:
* aperture opening
* available light in the scene
* desired effect
* film speed.
The shutter speed setting affects both the light exposure to the film and the way movement is rendered in the resulting photo. Shorter shutter speeds (meaning the shutter opens and closes at a faster rate) are typically used for fast moving objects to quickly freeze them within the frame. Conversely, longer shutter speeds tend to be used in scenes of low lighting, still objects or if the photographer wants to create an artistic blur.
A rule of thumb for knowing how to set shutter speeds is that the larger the aperture setting, the faster the shutter speed should be set to affect the same level of light exposure.
Aperture
Aperture refers to the lens diaphragm on a camera that controls the amount of light that touches the film when the shutter opens. Settings for an aperture opening are measured in f-numbers, also known as the F-Stop. F-numbers are calculated by dividing the length of the lens� diameter by the focal length. Aperture settings are generally located or adjusted on the outer edge of a camera�s lens.
*Larger aperture settings, ranging from around f3.0 to f5.5, allow more light to enter through the lens. Consequently, if a photographer sets his aperture to a higher number, a single object will become the photo�s central feature, significantly minimizing any figures in the pictures background. Larger apertures are commonly used for portraits or close-ups.
Alternatively, smaller apertures, ranging from f16 to f32, include more figures in the foreground, as well as the background. In such pictures, more elements are clearly defined than a single central object. As a result, photos taken with narrower apertures lend more perspective to a scene. Landscapes and cityscapes are the usual subjects of pictures taken with smaller apertures.
If a photographer is taking a picture that doesn�t require an extreme close-up nor a broad scope, an aperture setting from f8 to about f11 tends to yield well-defined images.
Depth of Field
Depth of Field refers to the distance around an object that appears in focus in the frame or photograph. The depth of field that a photographer chooses to enhance a given picture is an entirely subjective choice, depending on the aspects he wishes to enhance within the given frame.
* Three factors play a hand in determining or affecting depth of field: the lens aperture (how open the lens is), the length of lens being used and the object�s size (the later includes the distance the object is away from the photographer).
The closer an object is to the lens, the less depth of field will appear in the resulting photograph. Conversely, placing the camera at a distance from the object being photographed will create a greater depth of field. For example, landscape shots tend to have greater depths of field while portraits have minimal depths of field.
Similarly, smaller lens apertures (lens with smaller diameters) and shorter lens lengths both create more broad depths of field.
When looking at a picture, you can recognize its depth of field by noticing where the photo becomes blurry and unfocused. The outer fuzzy edges pinpoint where the picture loses its depth of field.
__________________
Trucking them states
Trucking them states
Big Black Trucking
Join Date: Aug 2006
Posts: 968
Likes: 0
Received 0 Likes
on
0 Posts
Portfolios 101
by Nancy Hill
At some point in your journey into photography, you will know the time has come to show your work to people beyond your circle of friends and family. As wonderful as it is to know that time has arrived, it can also fill you with self-doubt. Letting those doubts hold you back could keep you from doing something that will bring you great rewards, and, the truth is, everyone has doubts. So take a deep breath and move on to a new step: develop a portfolio to show to art directors, gallery owners, and prospective clients.
Building Your Portfolio
A portfolio is a body of work with a central theme. It shows your vision and holds images that showcase your photographic talent and insight into your subject.
Every portfolio has a theme. Before you put your work together, find the themes that run through your images, then determine one that showcases your work. What subject matter shows the most insight? Pretty pictures alone won�t impress an art director or gallery owner. Your work has to have your unique stamp on it. Which body of work does this well?
It�s sometimes hard to judge your own work, so you may want to ask someone you trust for an opinion.
Purpose and Audience
Clearly define your purpose for assembling a portfolio. Who do you want to reach? Do you want to get jobs or have your work shown in galleries? Know this before you begin so you can select images and prepare your portfolio accordingly.
Once you figure out who your audience is, familiarize yourself with the kinds of photography that will interest it. An ad executive specializing in high-end clients is going to want to see slick, cutting-edge work. A portrait photographer who specializes in families will want to know you can capture groups of people. Art galleries also have their own preferences, so do your homework and make sure your work is something the gallery you are interested in shows. Don�t show nudes to a gallery that specializes in landscapes. No matter how striking your nudes, if that�s not what they�re looking for, you�ll be wasting your time, and theirs.
Selecting the Images
Gather all the images you think will interest your audience. Now sort through your prints or slides, eliminating anything that isn�t perfect. Slightly out of focus won�t do. Forget about trying to slip in any shots that are less than original. And keep your theme in mind. Don�t even let yourself think, �But everyone raves about this one. I�ll just slip it in at the end so they can see I really have an eye for things besides landscapes.�
If you have more than 30 prints after your first round of elimination, go back and eliminate some more. Aim for between 12-20 images. Maybe you can stretch your portfolio to 25 prints, but beyond that and you will tax the viewer�s patience and show that you are not yet a pro. Gallery owners, clients, and art directors are never shy about asking to see more of your work if they�re interested, and they will set up another appointment to meet with you to see it.
Either color or black and white is fine, but don�t mix the two together. The same usually holds true for the format you used when you took the pictures.
Presentation
There are several ways to go here. Some people send prospective buyers or gallery owners to a web site or send a CD. I advise against this. If your images will be shown as prints, provide prints. Computer screens simply don�t have the same color and textures as actual prints. You also have no idea how the viewer�s monitor is set up, so what looks great on your screen may be way too dark on the one your viewer will use. Don�t risk it.
One of the popular ways to organize your portfolio is in a binder that zips on three sides and has rings inside that hold clear pockets for your prints. These come in a variety of sizes, are professional, and you�ll be able to find one to fit your budget. Some photographers also use a briefcase style. Look around until you find one that fits your style.
If you�re going to show your images to a gallery, I recommend you purchase a portfolio box, which a photo store geared for professionals will carry. You can also find these online at www.lightimpressionsdirect.com or similar web sites that carry photo equipment for professional photographers. Always mat your work for this type of presentation. Neutral mats are best. Mats should be identical for every print in your portfolio, although the windows in the mats can vary.
Present your images in a logical order. Choose a cover image to represent the portfolio as a whole. This doesn�t mean it should have the name of your portfolio on it, but rather it should be the first image in your portfolio and should be an excellent representation of your theme.
Choose a size that works best for your work. Make sure your presentation case holds your prints comfortably.
Always keep your images fingerprint and damage free. If a mat is damaged, replace it immediately.
Other Things You Can Include in Your Portfolio
While your work is certainly the most important part of your portfolio, some photographers like to include additional information, including:
� an artist statement,
� a list of the photographs in the portfolio,
� a CD of the portfolio to leave behind, and
� thumbnails of photographs to leave with the art director or gallery owner.
Where to Find Supplies
Photography stores and web sites geared to the professional photographer will sell quality portfolio products, from carry cases and boxes to mat supplies and plastic sheets through which to view your work. Art supply stores are also good places to check out.
Putting together a portfolio is one of the best things you can do for your work. Even if you don�t feel quite ready to hit the galleries, your portfolio is a statement that your work is worthy of a professional quality presentation. There�s no feeling quite like the one you get when you have completed a cohesive body of work.
__________________
Trucking them states
Trucking them states
it's always something
Join Date: Jul 2003
Posts: 957
Likes: 0
Received 0 Likes
on
0 Posts
this information has been very useful to me in the last couple days. i'm sure i'll have some questions as i get more into it.
__________________
91 ranger, 88 tc 2.3 turbo, stroked, bored, 5.5" crower connecting rods, wiseco 8.0:1 dished pistons, total seal .030 rings, fully ported iron big valve head, racer walsh turbo roller cam, bobs log, holset wh1c, fmic, full 3" exhaust. not really a whole lot left to do.
93 explorer 4x4

91 ranger, 88 tc 2.3 turbo, stroked, bored, 5.5" crower connecting rods, wiseco 8.0:1 dished pistons, total seal .030 rings, fully ported iron big valve head, racer walsh turbo roller cam, bobs log, holset wh1c, fmic, full 3" exhaust. not really a whole lot left to do.
93 explorer 4x4


