
Front Strut-Spring Removal/Camber Plate Install(Hotchkis/K-Sport etc) w/ Torque Specs

Thread Starter
S/C'ed C/F Connoisseur
Joined: Sep 2007
Posts: 1,258
Likes: 0
Note: This should be the same for all 7thgen Celica's, Matrix and possibly Vibe
I recently had to swap out my top camber plate pillow mounts and figured it would be a good time to take pics and make an install for suspension and top mount camber plates. I made this for Newcelica but figured it could be usefull for people on here. Hope it helps
NOTE: I am in no way responsible for any installations don’t following this guide. All car installations should be done by licensed and insured mechanics
Tools needed:
-Ratchet
-Small and long extension
-10mm
-12mm
-14mm
-17mm
-19mm
--Note one or 2 of those may not be used but I forget and better to have them
-Deep socket 19mm (for Hotchkis camber plate top nut.)
-Torque Wrenches (for Hotchkis)
-Allen Wrenches
-Car Jack
-Friend or a Vice (to torque down top nut)
Optional:
-2nd or 3rd Jack for other side and for the brake setup
-Jack Stands (make life safe and easy as well as allowing you to leave the project for a while without worry about the car falling
-Wheel Chocks (*sp) (rather the car not roll away)
-Torque Wrench (Highly recommended, I use one for every install now and it’s a lifesaver. You can get them cheap anywhere but make sure it can go up to 110ftlb)
-Rags (try to keep crap clean when you work on the car )
)
-Spanner Wrench (if on Coil-Over setups)
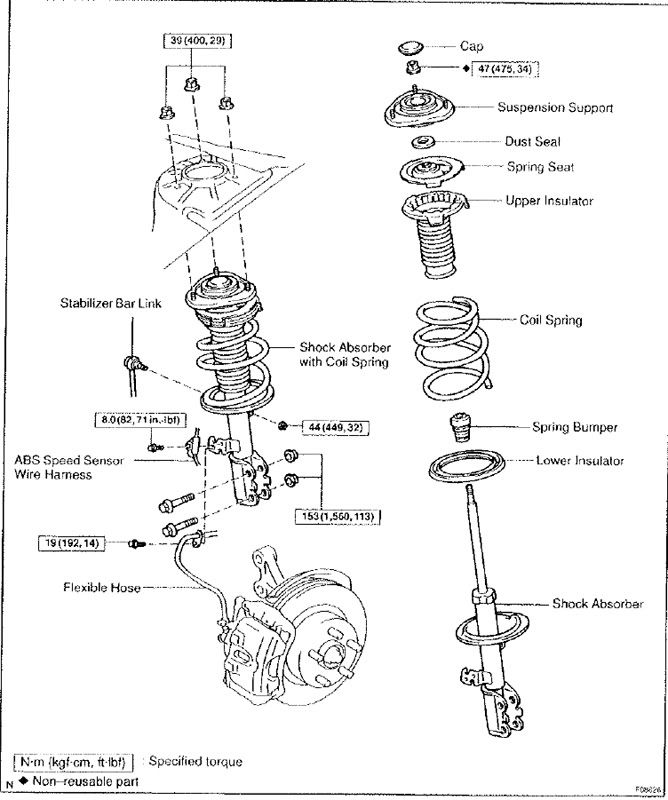
-Laptop with the Volume 2 Celica manual on pages 576+ for suspension diagrams and torques
Remove the wheels:
-Crack all of the front wheel lug nuts (just so to are slightly loosened)
-Place wheel chocks (*sp) behind the back wheels just for safety
-Jack up the car either from the front tow hook area or the frame rail. I like the side frame as its solid and you have to jack up the side less. However if the car is too low you may either need to use the stock jack on the side 1st then get a pump jack, or start from the front.
-Either jack up one side or both if you have jack stands to place under each side for ease.

-Remove the wheels and place to the side
-Admire 1 off large brakes and shinny suspension (if applicable)

Remove the Strut Assembly:
-1st, if you have a 2nd jack (I used the stock jack for this part) place it under the pivot for the brake/hub setup. Jack up to the point where the brake has slight pressure but not enough to raise the car. NOTE: this is for ease when lowering the shock later hence not needing to push it up)

-Crack the 2 large (19mm) shock bolts just so they are loosened but don’t remove (or remove the nut but leave the bolt in, either works)
--This will most likely require a breaker bar or torque wrench as they are on with 113+ftlb’s

-Remove the Brake line and ABS line from the strut. This location may vary on suspension setup but they are the only 2 lines attached.
--ABS line is a 10mm and I think the brake is 12 or 14 (leaning to 12mm)

-Remove nut on the Endlink. For stock this may involve an Allen wrench, I don’t recall as I am using the Tein end links now

**For Coil-over setups: loose then coils to where there is no tension on the coil for ease of top mount replacement latter and less chance of a spring shooting away from you.

-Now remove 3 upper top bolts – This will vary per suspension setup

-Utilizing the jack under the brake (if you used it) slowly lower the whole assembly down until either it wont lower anymore or the strut top is clear of the upper holes
-Remove the 2 large shock bolts that you loosened before and Remove the strut assembly.

NOTE: In order to remove the stock top mount, if on stock springs or any other where there is still much compression of the springs when off the car, you made need to use a spring compressor (can rent them at autozone for around $40) to safely remove the top. PLEASE follow another install on here that has more specific instructions for removing this top mount safely so no one gets injured

New Top Mount installs - Hotchkis Style
-For the Hotchkis style, there are many more pieces for the setup then on a c-one/k-sport/cusco/tein style.
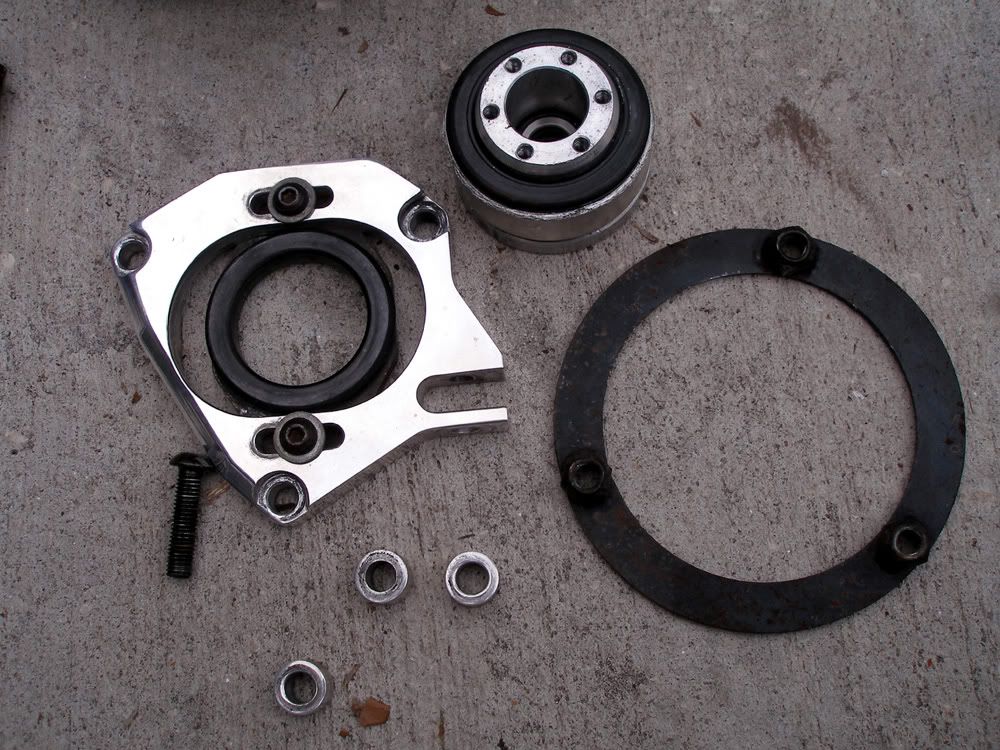
-1st install the outer Top mount assembly.
--composed of the larger top polished piece, underside black ring and 3 spacers for the top.
-place the 3 spacers over the holes and place the outer/upper top ring over the spacers/holes.
-Drop the black Allen bolts down from the top.
-While holding the bottom ring from the underside screw the assembly together.
--NOTE: I do not have the torque specs for these bolts but best guess is around 30 as that is the stock spec for those 3 bolts.

-Now assemble the Strut setup:


-With either the springs compressed or the coil over setup sitting there, place the cylinder over the top strut thread bolt on the spring seat and using a Deep Socket 19mm thread down the top nut.
-Using either a Friend / a vice / or your spanner wrench for coil over, torque down the top nut while it’s off the car to 34 ft-lb


-Place the shock assembly back in the wheel well and put in the 2 large strut bolts to hold it in place.
-Now slowly raise the whole assembly up into the upper/outer ring setup. Make sure that the rubber gaskets are not pinched or fall off.
-Raise it up until it won’t go up anymore and leave it there.

-Now place the Hotchkis top plate cover over the assembly and screw in the 6 Torque Bolts (no idea what Torque, I just did it till they were tight.

-----FOLLOW Strut Bolts Re install At the end of this install.
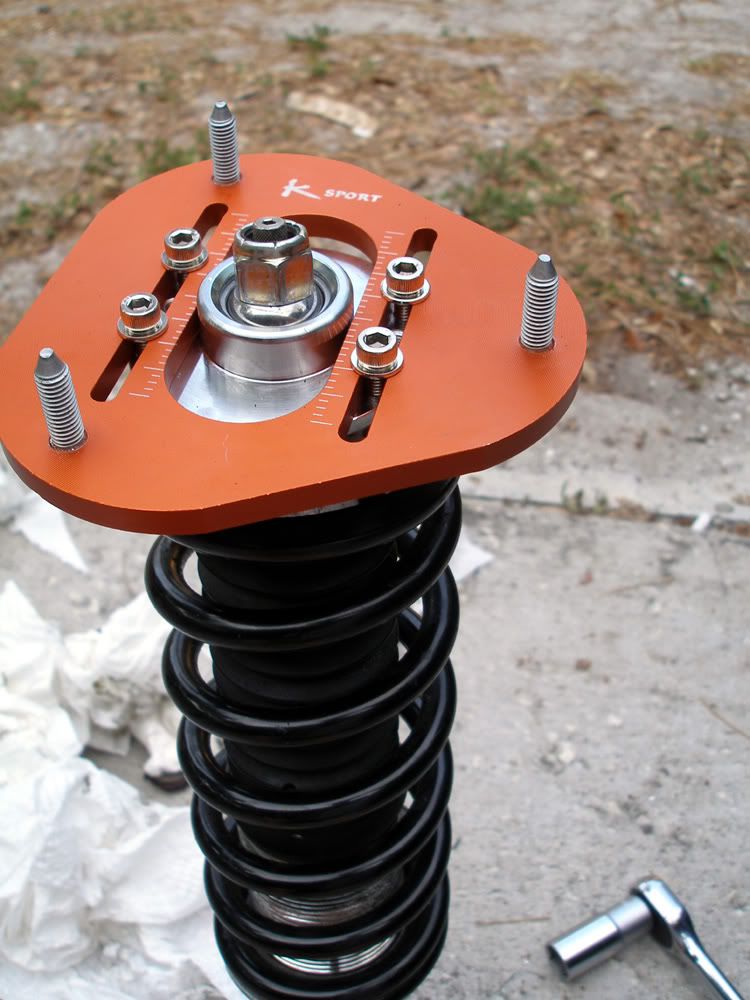
New Top Mount install – K-Sport / C-one / Cusco / tein Style.
This is directed specifically to the K-sport setup as that is what I used. I am sure the others are very similar but I can not guarantee they are exactly the same especially with the ball bearing collars.
-Unlike the Hotchkis, there is no separate strut and upper mount assembly, It is all in one. For the K-Sport there is the full camber top pillow mount and 2 collars.
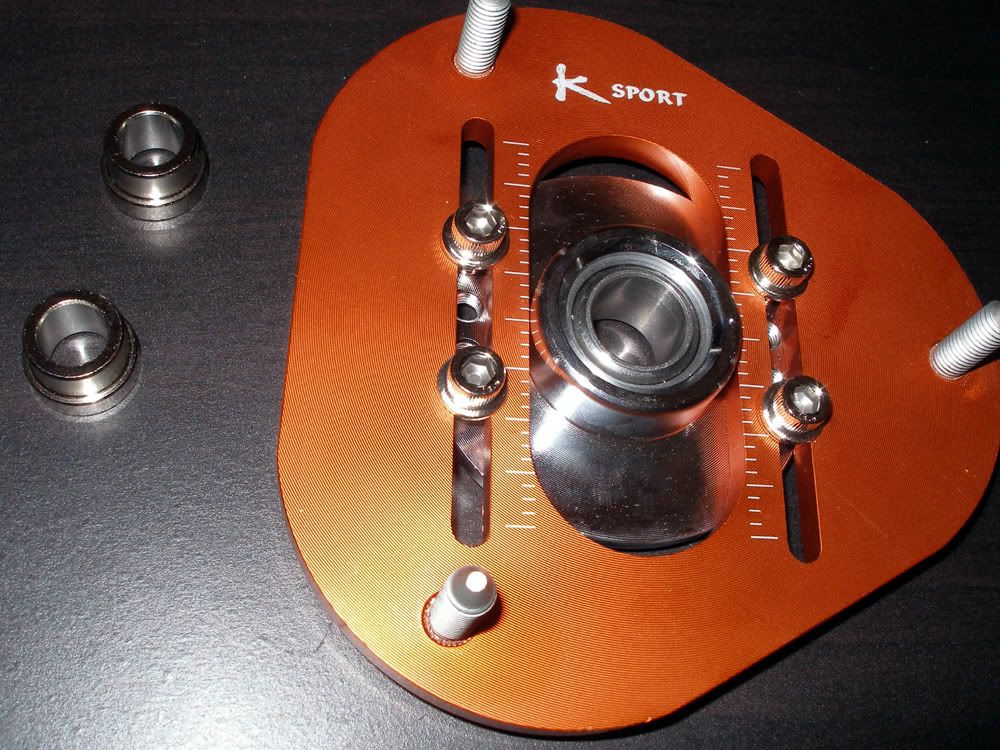
-For my Tein SS coil overs these collars would not fit. The diameter was too small and the thickness of them together would not allow me to put on the top nut.
-I chose to use only the lower collar as it allow the mount to sit correctly, however I only can thread the top nut � way. If this is the case with yours make sure you at least torque it down to spec but I cannot guarantee it will be safe for how long so do this at your own risk.
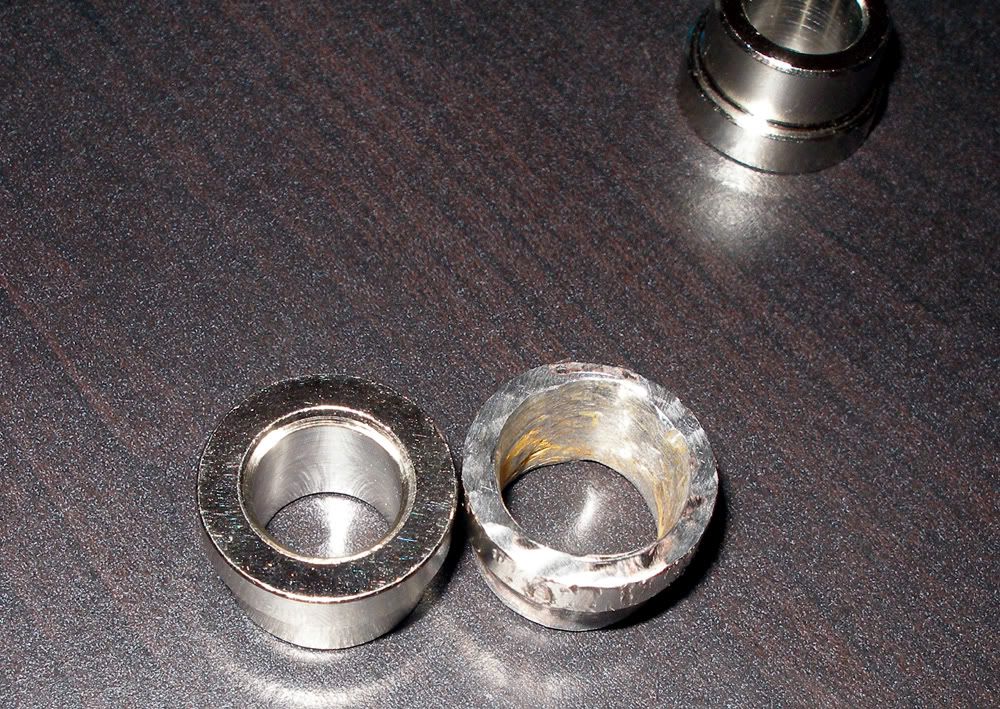
-Drill out the center of the lower collar for both just to the point where it can slip down the threads. If yours for some reason was the right size then more power to you.
-With either the springs compressed or the coil over setup sitting there, place the camber plate assembly over the top strut thread bolt on the spring seat and using a 19mm thread down the top nut.
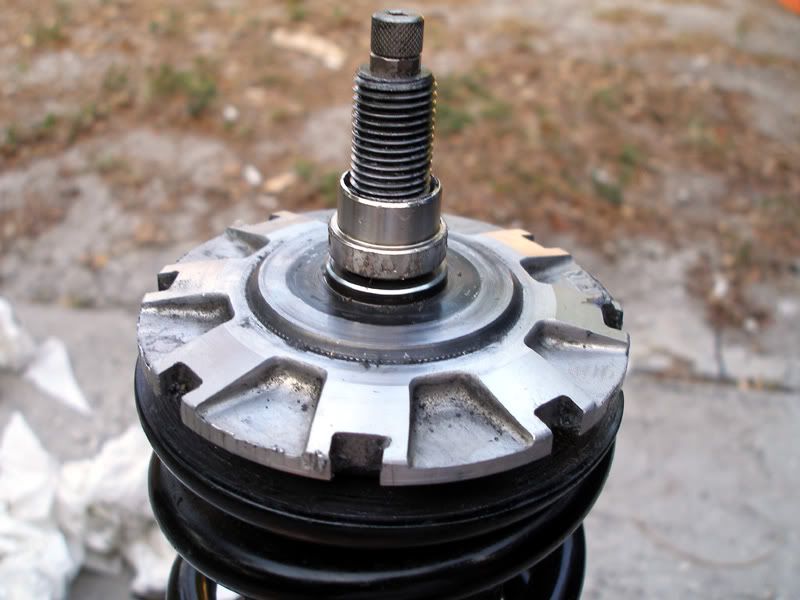
--Using either a Friend / a vice / or your spanner wrench for coil over, torque down the top nut while it’s off the car to 34 ft-lb with a 19mm socket.
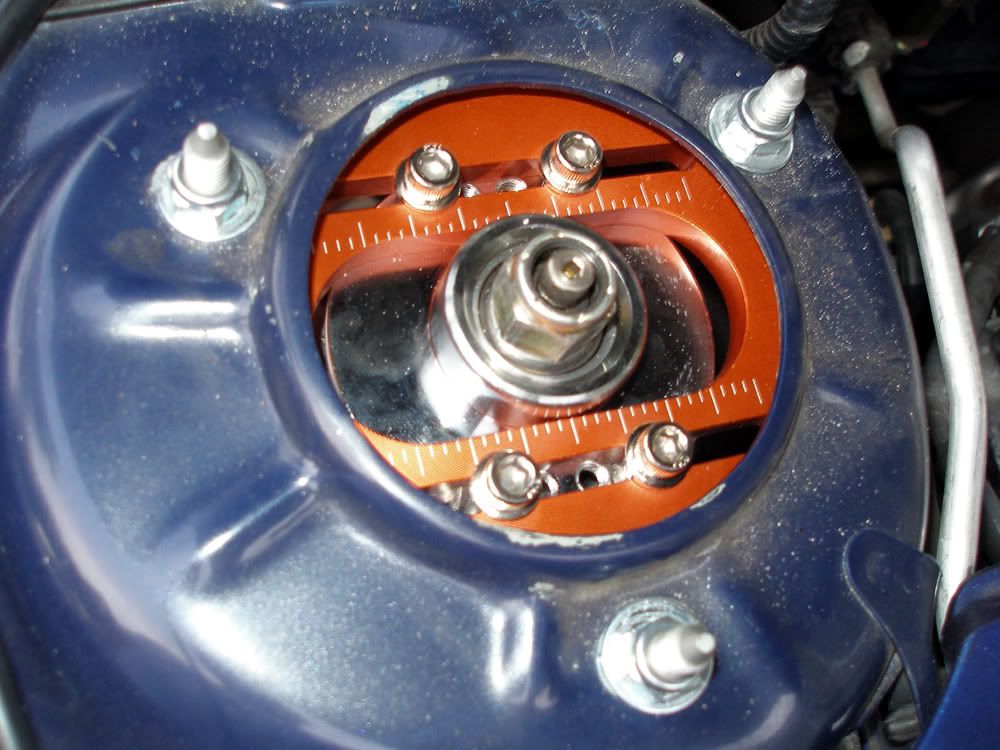
--Place the shock assembly back in the wheel well and put in the 2 large strut bolts to hold it in place.
-Now slowly raise the whole assembly up into the upper/outer ring setup. Make sure that the rubber gaskets are not pinched or fall off.
-Raise it up until it won’t go up anymore and leave it there.
- I do not know the size socket but with the 3 studs sticking up, replace the nuts. Tighten them down evenly rotating to each stud.
-Torque down to 29 ft-lb.
-----FOLLOW Strut Bolts Reinstall at the end of this install.
Reinstall of the lower Strut Assembly.
-Now that the top assembly is secure, replace all lower bolts.
-1st reinstall the 2 large strut bolts.
--These need to be torque down to 113 ft-lb
-Re install the brake line bolt
--Torque to 14 ft-lb
-Re install the ABS line
--Torque to 71 IN – Lb (or just hand tighten as I did)
-Replace bolt on the front End-link
--Torque to 32 ft-lb
-Now lower the jack that was holding up the brake assembly. This should just stay in position now.
---IF COIL-OVERS raise the coil collars back up to desired height
-Replace Wheel onto the hub replace lug nuts slowly going from lug to lug in a star pattern to tighten. Tighten as much as you can while its in the air.
-If you can torque the lug nuts while the wheel is in the air do so.
-Either in the air or when the car is down Torque the lug nuts to around 76 ft-lb
-With the car on the ground, recheck all of the top bolts to make sure they are at torque spec. Most likely you wont be able to turn the strut top nut as the while strut assembly spins.
Drive around, listen for noises and feel for any wobbles / clunks etc. Return and recheck lug torques and top bolt torques.
If you have questions let me know either PM on here: hombredelassrta or AIM: hombredelassrtas
I recently had to swap out my top camber plate pillow mounts and figured it would be a good time to take pics and make an install for suspension and top mount camber plates. I made this for Newcelica but figured it could be usefull for people on here. Hope it helps
NOTE: I am in no way responsible for any installations don’t following this guide. All car installations should be done by licensed and insured mechanics
Tools needed:
-Ratchet
-Small and long extension
-10mm
-12mm
-14mm
-17mm
-19mm
--Note one or 2 of those may not be used but I forget and better to have them
-Deep socket 19mm (for Hotchkis camber plate top nut.)
-Torque Wrenches (for Hotchkis)
-Allen Wrenches
-Car Jack
-Friend or a Vice (to torque down top nut)
Optional:
-2nd or 3rd Jack for other side and for the brake setup
-Jack Stands (make life safe and easy as well as allowing you to leave the project for a while without worry about the car falling
-Wheel Chocks (*sp) (rather the car not roll away)
-Torque Wrench (Highly recommended, I use one for every install now and it’s a lifesaver. You can get them cheap anywhere but make sure it can go up to 110ftlb)
-Rags (try to keep crap clean when you work on the car
)-Spanner Wrench (if on Coil-Over setups)
-Laptop with the Volume 2 Celica manual on pages 576+ for suspension diagrams and torques
Remove the wheels:
-Crack all of the front wheel lug nuts (just so to are slightly loosened)
-Place wheel chocks (*sp) behind the back wheels just for safety
-Jack up the car either from the front tow hook area or the frame rail. I like the side frame as its solid and you have to jack up the side less. However if the car is too low you may either need to use the stock jack on the side 1st then get a pump jack, or start from the front.
-Either jack up one side or both if you have jack stands to place under each side for ease.
-Remove the wheels and place to the side
-Admire 1 off large brakes and shinny suspension (if applicable)
Remove the Strut Assembly:
-1st, if you have a 2nd jack (I used the stock jack for this part) place it under the pivot for the brake/hub setup. Jack up to the point where the brake has slight pressure but not enough to raise the car. NOTE: this is for ease when lowering the shock later hence not needing to push it up)
-Crack the 2 large (19mm) shock bolts just so they are loosened but don’t remove (or remove the nut but leave the bolt in, either works)
--This will most likely require a breaker bar or torque wrench as they are on with 113+ftlb’s
-Remove the Brake line and ABS line from the strut. This location may vary on suspension setup but they are the only 2 lines attached.
--ABS line is a 10mm and I think the brake is 12 or 14 (leaning to 12mm)
-Remove nut on the Endlink. For stock this may involve an Allen wrench, I don’t recall as I am using the Tein end links now
**For Coil-over setups: loose then coils to where there is no tension on the coil for ease of top mount replacement latter and less chance of a spring shooting away from you.
-Now remove 3 upper top bolts – This will vary per suspension setup
-Utilizing the jack under the brake (if you used it) slowly lower the whole assembly down until either it wont lower anymore or the strut top is clear of the upper holes
-Remove the 2 large shock bolts that you loosened before and Remove the strut assembly.
NOTE: In order to remove the stock top mount, if on stock springs or any other where there is still much compression of the springs when off the car, you made need to use a spring compressor (can rent them at autozone for around $40) to safely remove the top. PLEASE follow another install on here that has more specific instructions for removing this top mount safely so no one gets injured
New Top Mount installs - Hotchkis Style
-For the Hotchkis style, there are many more pieces for the setup then on a c-one/k-sport/cusco/tein style.
-1st install the outer Top mount assembly.
--composed of the larger top polished piece, underside black ring and 3 spacers for the top.
-place the 3 spacers over the holes and place the outer/upper top ring over the spacers/holes.
-Drop the black Allen bolts down from the top.
-While holding the bottom ring from the underside screw the assembly together.
--NOTE: I do not have the torque specs for these bolts but best guess is around 30 as that is the stock spec for those 3 bolts.
-Now assemble the Strut setup:
-With either the springs compressed or the coil over setup sitting there, place the cylinder over the top strut thread bolt on the spring seat and using a Deep Socket 19mm thread down the top nut.
-Using either a Friend / a vice / or your spanner wrench for coil over, torque down the top nut while it’s off the car to 34 ft-lb
-Place the shock assembly back in the wheel well and put in the 2 large strut bolts to hold it in place.
-Now slowly raise the whole assembly up into the upper/outer ring setup. Make sure that the rubber gaskets are not pinched or fall off.
-Raise it up until it won’t go up anymore and leave it there.
-Now place the Hotchkis top plate cover over the assembly and screw in the 6 Torque Bolts (no idea what Torque, I just did it till they were tight.
-----FOLLOW Strut Bolts Re install At the end of this install.
New Top Mount install – K-Sport / C-one / Cusco / tein Style.
This is directed specifically to the K-sport setup as that is what I used. I am sure the others are very similar but I can not guarantee they are exactly the same especially with the ball bearing collars.
-Unlike the Hotchkis, there is no separate strut and upper mount assembly, It is all in one. For the K-Sport there is the full camber top pillow mount and 2 collars.
-For my Tein SS coil overs these collars would not fit. The diameter was too small and the thickness of them together would not allow me to put on the top nut.
-I chose to use only the lower collar as it allow the mount to sit correctly, however I only can thread the top nut � way. If this is the case with yours make sure you at least torque it down to spec but I cannot guarantee it will be safe for how long so do this at your own risk.
-Drill out the center of the lower collar for both just to the point where it can slip down the threads. If yours for some reason was the right size then more power to you.
-With either the springs compressed or the coil over setup sitting there, place the camber plate assembly over the top strut thread bolt on the spring seat and using a 19mm thread down the top nut.
--Using either a Friend / a vice / or your spanner wrench for coil over, torque down the top nut while it’s off the car to 34 ft-lb with a 19mm socket.
--Place the shock assembly back in the wheel well and put in the 2 large strut bolts to hold it in place.
-Now slowly raise the whole assembly up into the upper/outer ring setup. Make sure that the rubber gaskets are not pinched or fall off.
-Raise it up until it won’t go up anymore and leave it there.
- I do not know the size socket but with the 3 studs sticking up, replace the nuts. Tighten them down evenly rotating to each stud.
-Torque down to 29 ft-lb.
-----FOLLOW Strut Bolts Reinstall at the end of this install.
Reinstall of the lower Strut Assembly.
-Now that the top assembly is secure, replace all lower bolts.
-1st reinstall the 2 large strut bolts.
--These need to be torque down to 113 ft-lb
-Re install the brake line bolt
--Torque to 14 ft-lb
-Re install the ABS line
--Torque to 71 IN – Lb (or just hand tighten as I did)
-Replace bolt on the front End-link
--Torque to 32 ft-lb
-Now lower the jack that was holding up the brake assembly. This should just stay in position now.
---IF COIL-OVERS raise the coil collars back up to desired height
-Replace Wheel onto the hub replace lug nuts slowly going from lug to lug in a star pattern to tighten. Tighten as much as you can while its in the air.
-If you can torque the lug nuts while the wheel is in the air do so.
-Either in the air or when the car is down Torque the lug nuts to around 76 ft-lb
-With the car on the ground, recheck all of the top bolts to make sure they are at torque spec. Most likely you wont be able to turn the strut top nut as the while strut assembly spins.
Drive around, listen for noises and feel for any wobbles / clunks etc. Return and recheck lug torques and top bolt torques.
If you have questions let me know either PM on here: hombredelassrta or AIM: hombredelassrtas
__________________
MP62 Supercharged
"Who Needs Moral Fiber When You Have Carbon Fiber"
"Who Needs Moral Fiber When You Have Carbon Fiber"
Last edited by hombredelassrtas; May 26, 2008 at 09:17 PM.


