Johnny Cash Mustang project

Registered User
Thread Starter
Join Date: Oct 2007
Posts: 6,052
Likes: 0
Received 0 Likes
on
0 Posts
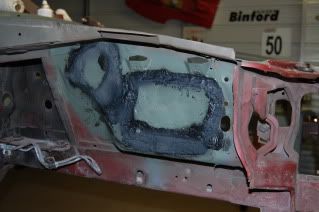
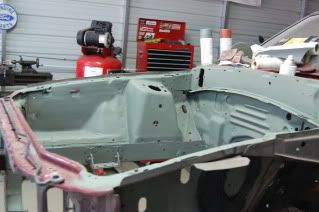
OK do any of you remember JC's old song about his 1959-60=61 Cadillac, where he steals the car from the factory a piece at a time? Well here's the Fox version of it. I race in the FAST series autocross in central Florida, the rules are fairly simple and reasonable, (unlike other groups). So in my quest to constantly run faster than the import crowd, this is my latest offing, a 1987-88-89-90-93 Mustang. I figure I might run it on track days so I might as well put a cage in it,
This is the look we're after.....


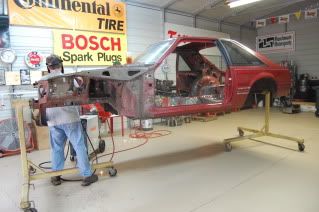
Step 1. Picked up a Mustang from a Tampa Racing member for $50 had some buddies load in on the trailer and then onto the rotisserie.
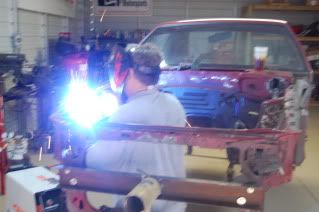
Step 2. start welding up the 15 thousand tiny holes Ford drills all over the engine bay.

This is the look we're after.....
Step 1. Picked up a Mustang from a Tampa Racing member for $50 had some buddies load in on the trailer and then onto the rotisserie.
Step 2. start welding up the 15 thousand tiny holes Ford drills all over the engine bay.

Registered User

Join Date: Mar 2006
Posts: 983
Likes: 0
Received 0 Likes
on
0 Posts
if you need a hand i'm right down the street, nice project to build the way you want from ground up
__________________
All American Street Car Performance<--- Facebook page link, check us out!
6187 126th Ave North
Largo fl 33773
MV#72427
(727)535-6905 - Shaun
All American Street Car Performance<--- Facebook page link, check us out!
6187 126th Ave North
Largo fl 33773
MV#72427
(727)535-6905 - Shaun

Registered User
Thread Starter
Join Date: Oct 2007
Posts: 6,052
Likes: 0
Received 0 Likes
on
0 Posts
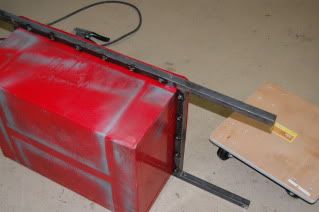
OK it's time to build the bracket for the fuel cell, I located some 1 inch square stock, and, using the cell as the template welded up the bracket. I used the cell as the template since they are never perfectly square, this way I can fudge some of the holes in the brackets.
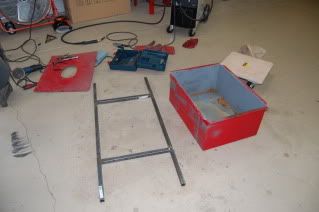
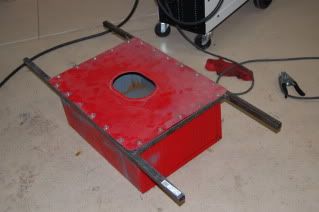
I had to "massage" the hole in the cell's box for the plate..
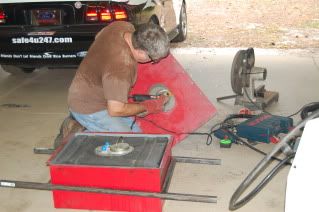
Once everything was mocked together, I used some 1-1/2 inch bolts, redrilled the holes through the cell box, and through the bracket. I then welded nuts on the brackets. This was because it is a PITA to access both the nut end and the bolt end when the unit is in the car.
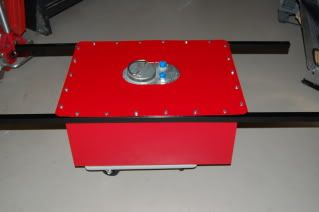
This is what the complete unit looks like, ready for paint and installation
I've just been informed that my cage has arrived.............
I had to "massage" the hole in the cell's box for the plate..
Once everything was mocked together, I used some 1-1/2 inch bolts, redrilled the holes through the cell box, and through the bracket. I then welded nuts on the brackets. This was because it is a PITA to access both the nut end and the bolt end when the unit is in the car.
This is what the complete unit looks like, ready for paint and installation
I've just been informed that my cage has arrived.............
Last edited by blacksheep-1; 11-03-2011 at 06:49 PM.
Registered User
Thread Starter
Join Date: Oct 2007
Posts: 6,052
Likes: 0
Received 0 Likes
on
0 Posts
Here's the finished fuel tank and brackets....
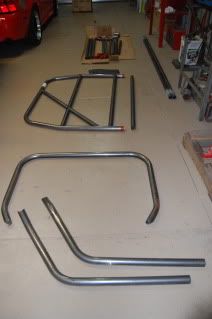
..and here's the Summit racing Allstar cage......
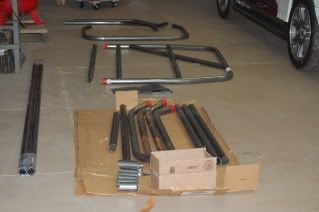
The parts in the foreground are the door bars, we probably won't be using them at this time, the autocross doesn't require the bars , (or cage for that matter) so they'll be left out for use in the future for possible track days. I'd rather leave them out since the cage is very heavy and I'm trying to save all the weight I can. That being said, this is definitely the time to install the main bars since the car is stripped down.
These are the parts I'll use for now, the main hoop, the halo and the front down tubes, along with the dash bar, the long tubes in the rear are for the rear down tubes. Those bars and the 1/8 x 6 inch plates were sourced from Applied Racing Technology in Clearwater.
..and here's the Summit racing Allstar cage......
The parts in the foreground are the door bars, we probably won't be using them at this time, the autocross doesn't require the bars , (or cage for that matter) so they'll be left out for use in the future for possible track days. I'd rather leave them out since the cage is very heavy and I'm trying to save all the weight I can. That being said, this is definitely the time to install the main bars since the car is stripped down.
These are the parts I'll use for now, the main hoop, the halo and the front down tubes, along with the dash bar, the long tubes in the rear are for the rear down tubes. Those bars and the 1/8 x 6 inch plates were sourced from Applied Racing Technology in Clearwater.
Registered User
Thread Starter
Join Date: Oct 2007
Posts: 6,052
Likes: 0
Received 0 Likes
on
0 Posts
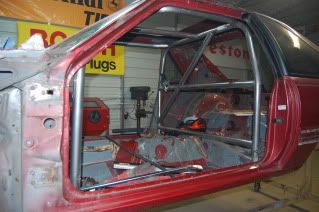
Ok I started on the cage today, first I jigged up the rotisserie so it was level front to back and side to side. then I placed the main hoop in, leveled it up and measured where the legs of the hoops would go. I used the door bars as jig, resting them on the door sill and tack welding them to the bars, this way I know in the future, if I decide to use them they'll fit.
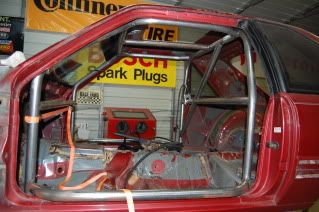
I then removed the cage, and drilled 2-1/4 holes in the floor where the legs will go, then I tacked the 1/8 inch floor plates down and re-installed the cage. (the reason for the 2-1/4 holes will be apparent shortly)
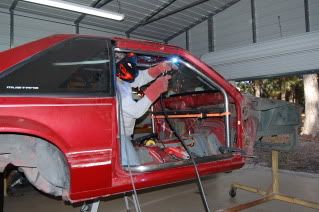
I welded up all of the seams. As you can see they took some help via a ratchet strap and some "C" clamps to get everything to fit. Once that was done, I removed the (tack welded) floor plates and dropped the cage through the floor in order to weld all of the top seams in the cage.

Then I pulled the cage back to where it's supposed to be, and replaced the floor plates, this time welding them in for real.
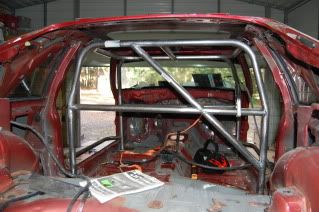
The almost finished product.
I then removed the cage, and drilled 2-1/4 holes in the floor where the legs will go, then I tacked the 1/8 inch floor plates down and re-installed the cage. (the reason for the 2-1/4 holes will be apparent shortly)
I welded up all of the seams. As you can see they took some help via a ratchet strap and some "C" clamps to get everything to fit. Once that was done, I removed the (tack welded) floor plates and dropped the cage through the floor in order to weld all of the top seams in the cage.
Then I pulled the cage back to where it's supposed to be, and replaced the floor plates, this time welding them in for real.
The almost finished product.
Last edited by blacksheep-1; 11-07-2011 at 02:48 PM.


